
| |||||
Tue 2026-06-16
Mon 2026-06-15
Sun 2026-06-14
Queer Fascism and the End of Gay History Sat 2026-06-13
Fri 2026-06-12
Thu 2026-06-11
Wed 2026-06-10
Mon 2026-06-08
Search
Archives
2024
12 11 10 09 08 07 06 05 04 03 02 01
2023
2022
2021
2020
2019
2018
2017
2016
2015
2014
2013
2012
2011
2010
2009
2008
2007
2006
2005
2004
2003
One good site
MDN
Nelson Minar
Blog licensed under a Creative Commons License
|
Last Sunday I had the pleasure to participate in making an aerial map, a very detailed overhead image of Dolores Park taken from 200’ to 400’. The fine folks at Public Laboratories have published the result. A couple of direct links: a full page slippy map and aerial video. I also got a nice single shot of the new Dolores Park playground (full size). 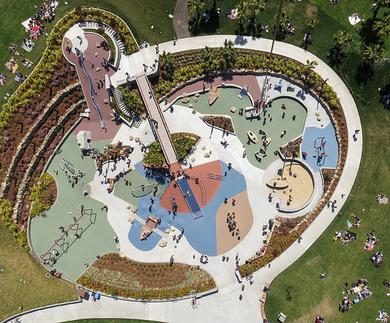 This kind of mapping comes from Public Laboratory, a cool non-profit helping ordinary people make their own aerial maps. You don’t need a satellite or fancy cameras on a plane to make a “satellite map”. All you need is a kite or balloon, a cheap point and shoot camera, and a little software. I particularly like how low tech the setup is. The lift comes from something as simple as a mylar balloon filled with helium (we used a car dealership ad balloon). No fancy cradle, just some rubber bands holding the camera to a plastic soda bottle with the soda cap as the clamp. And no special camera, just an ordinary consumer camera set to continuous drive with another rubber band holding down the button. Launch, fly for awhile, pick the best photos, then stitch them together into a map. (That last part takes some effort; you can do it by hand in Photoshop or use the MapKnitter web app). The Dolores Park shoot was mostly for fun, a nice way to be outside on a sunny day and excite a bunch of kids. But Public Laboratories participates in more serious projects too, like documenting the Deepwater Horizon oil spill. A key thing about this kind of mapping is anyone can do it relatively cheaply and quickly. You can also fly other sensors, they’re doing a lot of work in environment monitoring, Many thanks to Stewart Long and Bobby Sudekum for letting me tag along on the fun photo shoot.
Photoshop CS2 is the most expensive piece of software I own. I wanted
to migrate my license to Vista and it wasn't as simple as I'd like.
The main challenge is CS2 is an old version and Adobe claims it does
not work on Vista. Here's how to make it work anyway. I'm assuming you
have a legal copy: do not steal software.
I finally figured out why the colours in all my photos on Flickr look
wrong: Firefox is stupid and broken and doesn't honor embedded ICC color
profiles. I've been doing all my photo editing in Adobe RGB
and saving Adobe RGB JPGs with ICC profiles attached. Firefox ignores
the profile, interprets the images as if they're sRGB and the colours
end up all washed out.
One solution for this is to tell Photoshop to just do all the work in sRGB, the default that color-stupid apps like Firefox assumes. But I'm stubborn and want to use Adobe RGB when editing on the off-chance I want to print something. The solution is to convert to sRGB right before saving the JPG, via "Edit / Convert to Profile". In theory the Photoshop "Save for Web" option will take care of this for you, but in didn't seem to work for me and save for web does other things wrong anyway. Awhile back I bought a ColorVision Spyder to calibrate my monitors. It works great, makes a huge difference. Now that I understand better how profiles work (or don't work, in the case of Firefox) I think I can get consistent colour all the way to the printer.
Flickr started as a side project from a high concept
online game that was really an
excuse to socialize and collect things. The photo thing took and the
Flickr guys were smart enough to cultivate a success when they found
it, but games still pop up inside Flickr from time to time.
These games seem a bit silly, but I think people really like this kind of tokenization. It's not enough to say "this photo is good", the ritual of collection and the structure of game rules makes it seem more significant for people.
On Flickr there's a useful
thread describing a quick trick to make colours pop. You take your
photo, convert to Lab color mode, then compress the a and b colour
channels. This has the effect of making colours generally brighter at
the cost of destroying some detail in intensely
coloured parts of an image.
Not always a good idea, but it can make certain pictures look better. I've done it to about 5% of my photos I put on Flickr. To make life easier I've created a Lab color pop action set for you to download. First you should try the method manually once to understand what it's doing.
Thanks to Flickr it's finally easy to use geotagged photos. Alas, the
workflow is still very clumsy for using a GPS to geotag.
Here's what I came up with for Windows.
The flaw in the above workflow is it doesn't put the geotag data in your raw image originals. RoboGeo supports DNG but not CR2. Ugh. Keep the GPX files around. Alternative software:
gpsPhoto.pl,
grazer.
Congratulations to the Flickr team for their new geotagging
interface. I think this is the first time it's truly easy
for normal people to indicate where they took their photographs in a
way others can benefit from.
It's a bit late for a pony request, but I sure wish geocoding interfaces had a notion of uncertainty along with location. Ie: latitude, longitude, and radius. A photo geocoded to "San Francisco, CA" is different from a photo geocoded to "659 Merchant St. San Francisco, CA". The former has a radius of about four miles. The latter, 20 feet. Tagging your photos via a map interface gives a natural radius: a few pixels' width in the map the user clicked on. GPS devices have a natural uncertainy measurement, too. So the data's available, why not store it? Update: A Flickr developer wrote to tell me that their
geotagging does store and use accuracy data. If you ask for
photos in a precise location you don't see photos that are too
general. Cool! Looks like its in the
API too.
Thanks to pb
for the term fuzzy geocoding
I have about 300 photos from Australia I intend to edit and put online
before I leave for France. But as anyone who takes a lot of digital
photos will tell you, workflow is still a huge problem. Here's what I
do now:
A couple of folks wrote to suggest I try the Adobe
Lightroom beta. It's a lightweight photo workflow tool that combines an
image database with simple editing and printing tools. I like it,
particularly as a lightweight tool, and think it does 90% of what I do
with Photoshop only more easily. I'm looking forward to seeing this become
a real product, although it's hard to see how it will fit in with the
rest of Adobe's products.
I was curious about how many tags people put on their photos in
Flickr and whether more tags help you get into
interestingness.
So
using their fabulous
api I wrote a quick program to count the number of tags for photos
in
interestingness and compare them to photos in the huge
FlickrCentral
group. Numbers are averages and standard deviations for both the
author's own tags and for tags volunteered by others.
               Author tags  Viewer tags
FlickrCentral  7.5 (9.1)    0.1 (0.4)
Interesting    8.0 (6.4)    0.7 (2.2)
What's it all mean? Not much. The average FlickrCentral photo has 7.5 tags and the average Interesting photo has 8.0 tags. Well within the standard deviations, not a good predictor. Photos in Interestingness do have measurably more viewer contributed tags but that's not a surprise; photos in Interestingness have more viewers. So not an interesting result, but I love how easy it is to do this kind of data mining with Flickr. (For the record, I compared the top 100 interesting photos for each day so far in July, 1900 photos, with the 500 most recent photos in FlickrCentral). 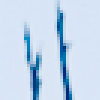 A lot of my photos from Australia
have bright blue skies with dark trees in front of them. Like
this.
One thing that irritates me when editing them is the tree branches have noticeable blue tints.
A lot of my photos from Australia
have bright blue skies with dark trees in front of them. Like
this.
One thing that irritates me when editing them is the tree branches have noticeable blue tints.
The problem is the branches are only a couple of pixels wide. And digital cameras aren't true colour sensors, but rather a Bayer filter mosaic of red, green, and blue sensors. So there's some aliasing in the mosaic pattern in the colour sensor. The raw convertor has to be particularly clever to figure out the true colours in the image. To put it another way, a digital camera sensor is going to have a very hard time with colour features only a couple of pixels wide. Here's a comparison of four raw convertors: Canon's Digital Photo Professional, Rawshooter Essentials, Adobe Camera Raw, and DxO Optics. To keep things consistent I used full defaults for each convertor. So ignore the exposure and overall colour, just look for bleed. To my eye the DxO image has the least bleed. The blow-up doesn't look as sharp in DxO, but I think that's actually more faithful to the reality. Tinkering around I think I can get the best-looking image out of DxO. It has lots of fancy camera body and lens-specific corrections and, apparently, a smarter demosaicing algorithm. But this kind of pixel-peeping doesn't make me a better photographer. And DxO is a pain in the ass. So I'll just stick with Photoshop. Still, the technological differences are interesting. Update: it's never simple. Turns out part
of the problem with the Adobe Raw image is the "Color Noise Reduction". At
the default of 25 you get blue branches; setting it to
zero eliminates a lot of the blue cast. Chromatic
aberration may also be partly to blame, even though this branch is in the
center of the image.
See also this
Flickr thread
|
||||


